Reach us here or email info@4x4downunder.com.au

How to Remove Roof Racks Safely and Efficiently from Your 4WD
Simplifying Roof Rack Removal: Safe and Efficient Techniques for Your 4WD
Removing roof racks from your 4WD might seem like a daunting task, but with the right approach, it can be a quick and hassle-free process. Whether you're upgrading, storing them for a while, or simply need your vehicle's original roof space back, knowing how to safely and efficiently remove roof racks is essential.
In this guide, we’ll walk you through the process step-by-step, so you can tackle it confidently without damaging your vehicle or the racks. Let’s get started!
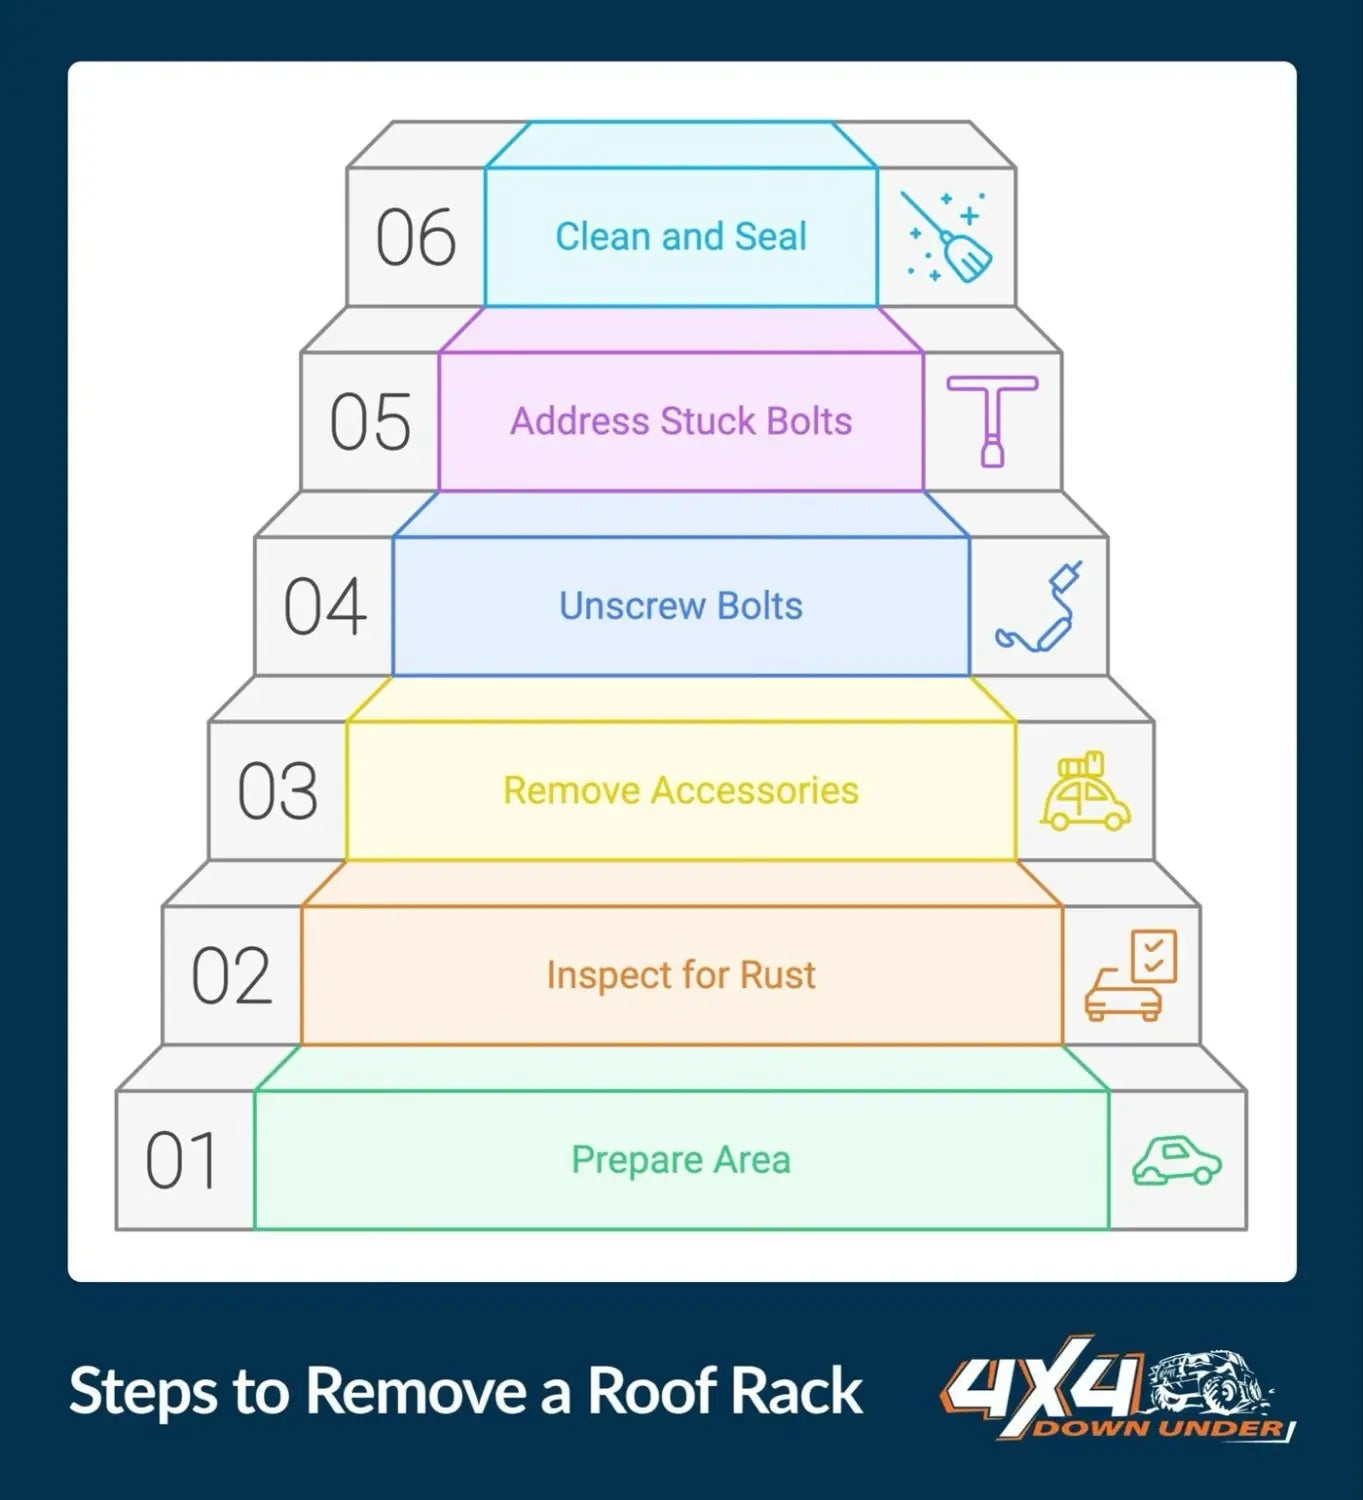
Want to take off those roof racks from your 4WD? Here's a quick guide:
- Park on level ground and gather your tools
- Check for rust and locate all mounting points
- Remove accessories and crossbar bolts
- Clean and seal mount points after removal
Why remove roof racks?
- Better gas mileage
- Less wind noise
- Sleeker look
- Easier to clean
Key steps:
- Safety first: Use proper tools and wear protective gear
- Find mount points: Check your manual or look for hidden covers
- Remove crossbars: Unscrew bolts (usually 16) with a T30 torx bit
- Deal with stuck bolts: Try penetrating oil, heat, or a screw extractor
- Clean up: Seal holes and treat any rust spots
Remember: Take your time, especially with stubborn bolts. Rushing can damage your 4WD's roof.
Safety Steps Before Starting
Before you start taking off those roof racks from your 4WD, let's talk safety. Here's what you need and what to check:
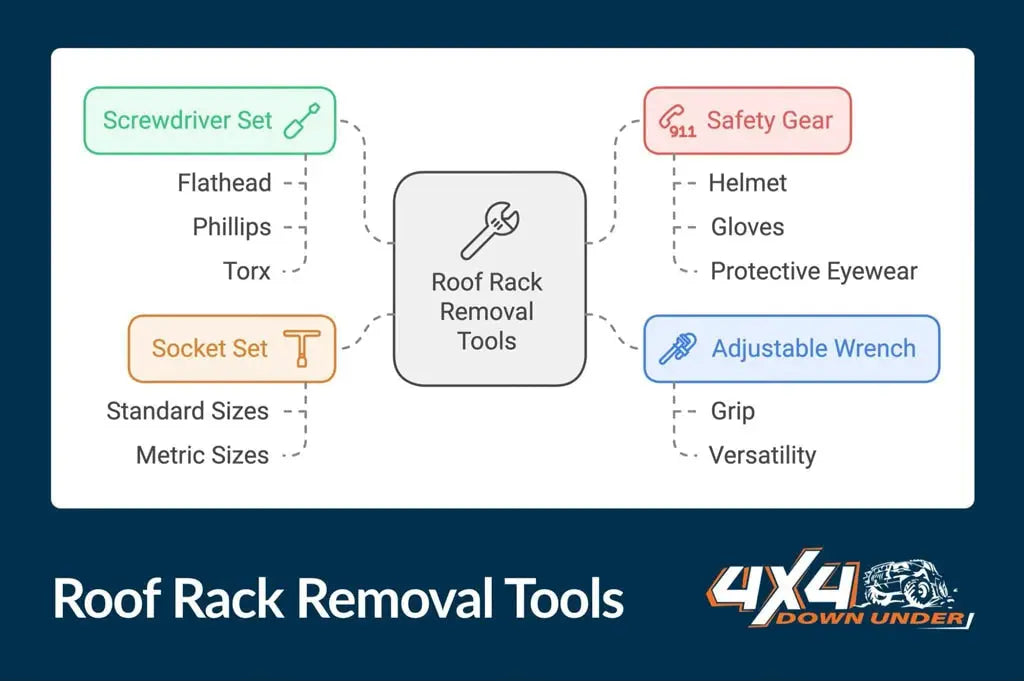
Tools You'll Need:
 Grab these tools:
- Adjustable wrench
- Screwdriver set (flathead and Phillips)
- Socket set
- Pliers
- Work gloves
- Safety glasses
- Stepladder or sturdy platform
Having these ready will make the job a lot easier.
Safety Checks
Now, let's make sure you're working safely:
Park your 4WD on flat ground away from traffic. This keeps things stable and reduces accident risks.
Protect your vehicle's roof with a soft blanket or towel. You don't want scratches, right?
If you're using a stepladder, make sure it's on solid ground and locked in place. Better yet, have a buddy hold it for you.
Put on those work gloves and safety glasses. They're not just for show - they'll protect you from falling bits and pieces.
Check the weather forecast. Windy day? Maybe wait it out. Wrestling with roof racks in the wind is NOT fun.
Clear the area around your vehicle. You don't want to trip over anything while you're working.
Take a look at your vehicle's manual. There might be some specific instructions or warnings about removing the roof racks.
"It is essential to take security precautions to be protected from risks and dangers." - Bamboli LTD
Bamboli LTD's got it right. By following these steps, you're setting yourself up for a safe and smooth roof rack removal. Let's get to it!
Check Your Roof Racks First
Before you start yanking those roof racks off your 4WD, take a good look at them. This quick check can save you headaches later. Here's what you need to do:
Finding Mount Points
First up, find out where those racks are actually attached. Sounds simple, right? Well, different 4WDs can surprise you. Here's how to figure it out:
- Grab your manual. It's your best bet for finding those mount points.
- Look for sneaky plastic covers. Some 4WDs, like certain Pajeros, hide their mounting points under these.
- Check out the attachment style. Are they on crossbars? Directly on the roof? Maybe on side rails?
- Count 'em up. Usually, you'll find six points - two front, two back, two middle. But don't bet on it - always double-check.
"If you want to get down to the rain channels then yes you need to get under the roof lining at each of the six mounting points to access the nuts." - Pajero 4WD Club of Victoria Forum Contributor.
This quote's a heads up: some mounting points might be playing hide and seek under your roof lining.
Looking for Rust

Rust: Your 4WD's Sneaky Enemy
Rust is your 4WD's sneaky enemy, especially with roof racks. Here's how to spot it:
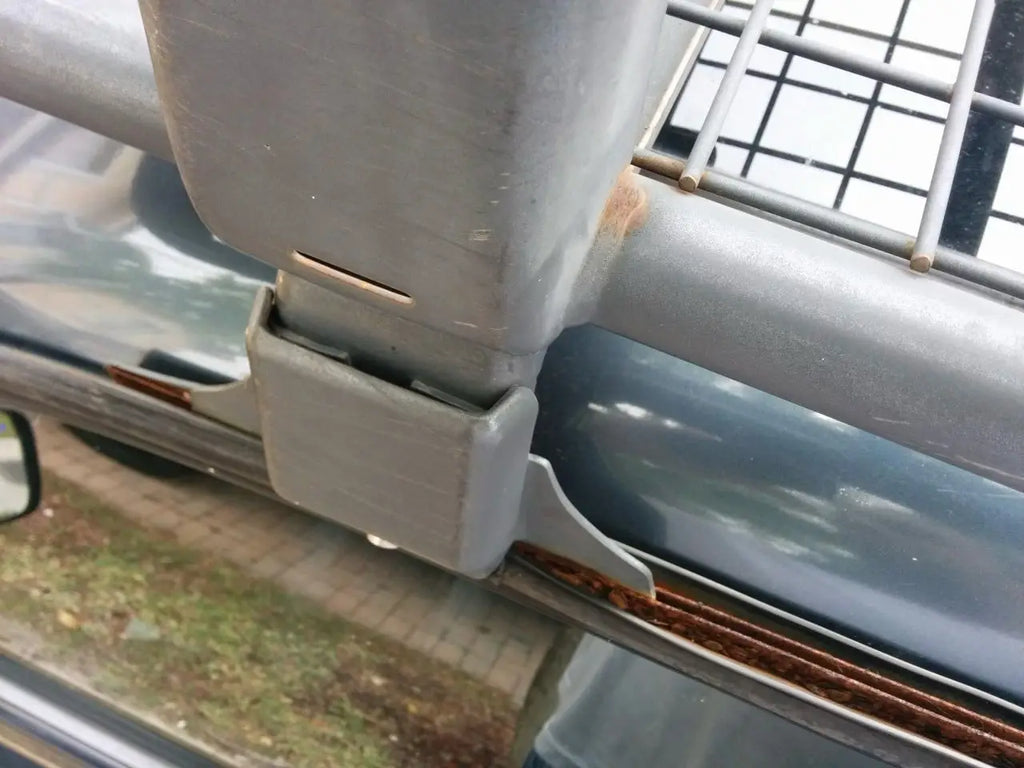
- Eye those visible areas. Any orange or brown? That's your red flag.
- Check under the paint. Bubbling or flaking? Rust might be lurking.
- Inspect the bolt threads. Rusty threads = harder removal.
- Peek under the rack. Water loves to hide and rust things up there.
Found Some Rust? Don't Sweat It
Try these tricks:
- Douse it in penetrating oil like PB Blaster. Let it sit for a few days before you try removing anything.
- For surface rust, a rust converter can stop it in its tracks.
"I flaked off everything that would come off, brushed the rust off, and used flex seal only because I didn't have a window of time to use POR15." - Forum Contributor
This real-world fix shows you can tackle rust even when you're short on time. But remember, if it's bad, you might need to bring out the big guns.
Taking Off the Roof Racks
You've checked your roof racks and you're ready to remove them. Let's get those racks off your 4WD without scratching up your ride.
Removing the Crossbars
First things first: take off any extras like bike racks or cargo boxes. It'll make your job easier.
Next, find the mounting points. You'll usually see six - two up front, two in back, and two in the middle. Some 4WDs, like certain Pajeros, hide these under plastic covers.
Now, grab your T30 torx bit or screwdriver. You'll need to remove 16 bolts holding the rack in place. Don't lose these bolts - you might want to put the racks back on someday.
Once the bolts are out, lift those crossbars right off. Be careful not to scratch your roof.
Finally, give those mounting areas a good clean. It'll help you spot any issues and prep the surface if you're planning to seal the holes.
Dealing with Stubborn Bolts
Sometimes those bolts just won't budge. Here's how to handle them:
- Try penetrating oil: Forget WD-40. Get yourself some PB Blaster instead. Spray it on those rusty bolts and let it soak for a few days. Keep reapplying daily.
- Heat it up: If oil doesn't do the trick, try heating the bolt carefully with a heat gun. It can break through that rust.
- Use a screw extractor: For really stubborn bolts, a screw extractor might be your best bet. You can pick one up at most hardware stores.
- Last resort: drilling: If nothing else works, you might have to drill out the bolt. But be careful - this could damage the mounting point.
"First, do not use WD40. PB Blaster is much better. Let it soak for several days." - User bctlex, 4WD Forum
Take your time with stuck bolts. If you rush, you might strip them or damage the mounting points. That's a headache you don't need.
Once those racks are off, take a good look at your roof. Check for any rust or damage. You'll want to deal with that before you seal up those mounting points.
After Removal Care
You've taken off those roof racks. Nice work! But we're not done yet. Let's make sure your 4WD stays in top shape.
Clean and Seal Mount Points
Those mount points need some love. Here's why:
Roof racks can hide nasty surprises. One Car Talk Community user found out the hard way: "I took off the roof rack and found a ton of rust that ate through the metal in three different spots." Ouch!
To avoid this mess:
- Clean well: Use solvent on painted edges around mount points.
- Sand rusty spots: Go until you see clean metal.
- Treat rust: Use a product like POR-15.
- Seal holes: Use silicone for drilled holes.
"These drilled holes need to be sealed up with silicone too. This seal prevents water from entering your car should it rain." - Roof Top Overland
Stop Water Damage
Water's sneaky. Here's how to keep it out:
- Rubber Washers: A Nissan Frontier Forum user fixed leaky bolt holes with $9.21 Amazon rubber washers. The result? "This has worked to fix it! We just had 4 days of rain, and the headliner is dry!"
- Waterproof Adhesives: Try Gorilla Glue around bolt tubes. Forum user Clark says: "Gorilla glue is supposedly 100% waterproof, and is not affected by extreme heat and cold."
- Butyl Rubber Tape: Great for sealing gaps around mounting points.
- Original Screws: Not ready to patch? Put the old screws back in. Paint them white to blend in.
Keep an eye on those sealed spots. Regular checks can catch problems early and save you money.
Wrap Up
You've made it through the roof rack removal process! Let's recap the key steps and share some final tips.
Main Steps Review

Taking off roof racks from your 4WD isn't complicated, but you need to pay attention. Here's what we covered:
- Park on level ground, use the right tools, and wear safety gear.
- Check for rust and find all mounting points.
- Remove accessories, then take off the crossbar bolts.
- Use penetrating oil, heat, or a screw extractor for stuck bolts.
- Clean and seal mount points after removal.
Taking off your roof racks can make your 4WD perform better. It's like giving your wheels a spa day - smoother, cheaper, and better all around.
Real-World Tips
4WD owners have their own tricks. Here are some from fellow enthusiasts:
"I just used clear silicone around the screws and put them back in the holes." - User on Explorer Talk
This simple trick stops leaks and protects your vehicle's interior.
"One was tough to get off, so a neighbor used a dremmel to cut a part in the top, then a flathead screwdriver to get it out." - Donner, Explorer Addict
Sometimes, you need to get creative to solve problems!
Don't forget about maintenance:
"Regular cleaning and inspection of your roof racks will help extend their lifespan and ensure their safety while carrying your cargo." - Packasport
This advice is solid, whether you're keeping your racks on or putting them back later.
FAQs
Let's tackle some common questions about removing roof racks from your 4WD:
How do I take off a roof rack?
Taking off a roof rack isn't complicated, but it does require care. Here's a quick guide:
- Remove any accessories like bike racks or cargo boxes
- Unscrew the crossbars (usually attached to brackets)
- Take out the screws holding the brackets to your roof
"I'm getting ready to remove the roof rack on my 2006 Xterra", shared a user from Second Generation Nissan Xterra Forums.
Before you start, spray those screws with some penetrating oil. It'll make your job easier, especially if they're rusty.
How do I take off my roof rack?
The process is similar to the above, but here are some extra tips:
- Make sure you've got the right tools. Most roof racks use Torx screws, so you'll need a T30 bit.
- Before unscrewing, check for rust or damage. It'll give you an idea of what to expect.
- Don't rush. If a screw is stuck, don't force it. That's how you end up with stripped screws and a headache.
- As you remove screws and parts, keep them organized. You'll thank yourself when it's time to put it back on.
